
This part offers the functions of python coding in electrical engineering.
Applications of python coding in electrical engineering
I2C Communication Firmware Using Python
I2C is a two wire bus protocol commonly used by most of the microcontrollers, microprocessors, other IC's (chips) for digital communication. If you have any evaluation board where you need to communicate with a chip/device via I2C, you could purchase a 3rd party USB to I2C convertor dongle and use the following python code.
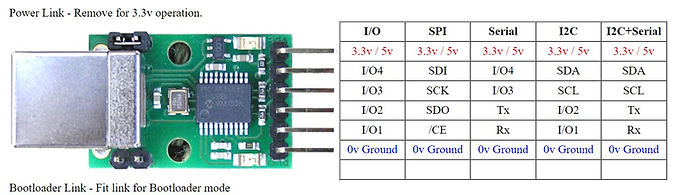
Step1: Purchase USB-I2C dongle
The USB-ISS Multifunction USB Communications Module provides a complete interface between your PC and the I2C bus, SPI bus, a Serial port and general purpose Analogue Input or Digital I/O. The module is powered from the USB. Operating voltage is selectable between 3.3v and 5v. and can supply up to 80mA at 5v for external circuitry from a standard 100mA USB port.
Step2: Setup your eval board, laptop and USB-ISS dongle like shown.

Step3: Download and install Pycharm Community edition software or any other python IDE along with python3.
Step4: Setup python environment and copy and extract USB-ISS library folder to your working directory.
Step5: Create your application example.py file in your working directory and copy the following code.
from usb_iss import UsbIss, defs
from bitstring import BitArray
import sys
# Configure I2C mode
iss = UsbIss()
#Enter your COM port number
iss.open("COMX")
iss.setup_i2c()
#I2C 7bit address, Reg Address, Byte Count, returns read value.
read_value = iss.i2c.read(0xA0, 0x36, 1)
first_byte = '{:08b}'.format(read_value[0])
second_byte = '{:08b}'.format(read_value[1])
#Convert first read byte into hex value
first_byte_hex = hex((BitArray(bin=(first_byte))).int)
#Convert read read byte into hex value
second_byte_hex = hex((BitArray(bin=(first_byte))).int)
# Write some data( device_add_write_hex, register_add_hex, data_hex(lsbyte...msbyte)
#Write value to slave I2C address
iss.i2c.write(0xA0, 0x50, [0x98, 0x71, 0x1D, 0x01])
Test and Measurement Instruments Automation
As a professional electrical/hardware/test engineer, it's important to learn automation of the test and measurement instruments such as Oscilloscope, digital multimeter, DC power supply, Thermal chamber/Oven, Signal Generator, Source meter, LCR meter, electronic load etc. Usually all these instruments come with following communication interface and every instrument will have its own command codes which you could find in its datasheet.
-
GPIB
-
SSH (Ethernet IP address)
-
Serial (UART)
-
RS-232
-
Telnet
There may be scenarios where you have may have to perform a custom automated test on your DUT(device under test) like shown in the example setup below.

In the above example, the communication interface to your DUT could be SSH/Telnet/UART/USB/I2C/SPI any other protocol. You may manually setup the test and measurement instrument like power supply, oscilloscope and signal generator which are connected to the DUT. In such cases the whole system can be easily automated using python. The example python code for various interfaces are shared below, using this you could write a full custom code for your setup.
GPIB Interface Python Code
This code will be compatible for instruments which has GPIB interface, usually like a power supply, oscilloscope, signal generator etc.
To read use the query function and put your instrument read commands inside the parenthesis.
To write use the write_ascii_values function and put your instrument write commands inside the parenthesis.
import pyvisa
rm = pyvisa.ResourceManager()
addresses = rm.list_resources()
instruments = []
#The addr will list the address of all the instruments connected via GPIB.
for addr in addresses:
print(f'Address: {addr}')
try:
inst = rm.open_resource(addr)
#Add any read command inside the query() for the instrument you have connected.
print(' ' + inst.query('*IDN?').strip())
#Add any write command inside the write_ascii_values() for the instrument you have connected.
your_values = list(range(100))
inst.write_ascii_values('WLISt:WAVeform:DATA somename,', your_values)
except:
print(' Instrument not found.')
Telnet Interface Python Code
The following is a example written to read temperature of the "Thermotron's 8800" thermal chamber/oven using its IP address via python telnet code.
import telnetlib
HOST = "10.100.57.250"
tn = telnetlib.Telnet(HOST, port=8888, timeout=1)
while True:
#Send your command to the host
tn.write(b"your_command\n\r")
time.sleep(1)
#Read back the returned value from the host for your_command sent to the host.
line = tn.read_some()
#Converting the read value into ascii
print('Value: ', line.decode('ascii'))
tn.close()
SSH Interface to Linux System Python Code
The following is a example written to communicate a Linux system using its IP address with SSH connection via python ssh code.
import paramiko
client = paramiko.SSHClient()
client.load_system_host_keys()
client.set_missing_host_key_policy(paramiko.AutoAddPolicy())
#Enter your Linux SSH IP address, username and password.
client.connect('xx.xxx.xx.xx', username='root', password='root', port=22)
#Linux command to go to next line.
ssh_stdin, ssh_stdout, ssh_stderr = client.exec_command('\n')
#Linux command to read a register value using devmem command
ssh_stdin, ssh_stdout, ssh_stderr = client.exec_command('devmem 0x50020088')
print(ssh_stdout)
UART Serial Interface to Linux System Python Code
The following is a example written to communicate a Linux system using UART serial connection via python pyserial code.
import serial
#COM port number, BaudRate, timeout, parity, rtscts, stopbits, xonxoff=0
#Open serial port
ser = serial.Serial('COM4', 9600, timeout=0,parity='N', rtscts=1,stopbits=1,xonxoff=0 )
#Send your device/instrument command inside write function
ser.write(b'hello')
#Read serial outputs
line = ser.read()
line = ser.readline()
print(line)
# check which port was really used
print(ser.name)
# close port
ser.close()
SCP File Transfer between windows PC and Linux System
SCP (secure copy protocol) is a network file transfer protocol that enables easy and secure file transfers between a remote system and a local host or two remote locations. It uses the Secure Shell (SSH) mechanism to provide authentication and encryption features for your data and credentials
SCP Windows <-> Linux Interface Python Code
The following is an example written to put/get a file from Linux system using its IP address via python SCP code.
import paramiko
#SCP Init
ssh = paramiko.SSHClient()
ssh.load_system_host_keys()
ssh.set_missing_host_key_policy(paramiko.AutoAddPolicy())
ssh.connect(scp_ipaddress, username="root", password="")
sftp = ssh.open_sftp()
#Your windows/Linux/MAC PC local path where your file is stored
localpath = os.getcwd() + '\\your_local_file_directory\\'
#Your Linux PC file path, where you want to transfer the file
remotepath = '/your_remote_directory/'
#Your file name
file_name = "sample.txt"
#Put file into the remote path from local path
#sftp.put(source, target)
sftp.put(os.path.join(localpath + '//' + file_name), remotepath + '/' + file_name)
#Get file from the remote path and put it into local path
#sftp.get(source, target)
sftp.get(remotepath + '/' + file_name, os.path.join(localpath + '//' + file_name))